Monkey Detection
 Monkey Detection
Monkey Detection using Computer Vision using AI. It uses live video stream from camera feed or rtsp streaming from ip camera or cctv or input images and use object detection to detect Monkey in these feeds. In this project I used YOLOV7 model to detect Monkey in the video feed.
Data Preprocessing
Data pre-processing is an important step for the creation of a machine learning model. Initially, data may not be clean or in the required format for the model which can cause misleading outcomes. In pre-processing of data, we transform data into our required format. It is used to deal with noises, duplicates, and missing values of the dataset. Data pre-processing has the activities like importing datasets, splitting datasets, attribute scaling, etc. Preprocessing of data is required for improving the accuracy of the model.
Requirements
- System
System requirements depends on complexity or size of object detection model, larger model will require more compute power and will be good at detection. I have used this in Google Colab with Tesla T4 GPU & Kaggle with Tesla p100 GPU which is a good device. With my Nvidia Geforce 330 MX GPU based system it is not sufficient to train a YOLOV7 model.
Minimum of 4GB NVIDIA Graphics Card is required to train YOLOV7 model.
- Python 3
Python 3.6 or higher. Tested with Python 3.6, 3.7, 3.8, 3.9, 3.10 in Windows 11 and Linux.
- Packages
Torch>= 1.7.0numpy>= 1.18.5opencv-python>= 4.1.1
This implementation is tested with PyTorch gpu in Windows 11 and Linux and Google Colab
Installation
- Prerequisites
All the dependencies and required libraries are included in the file requirements.txt See here
- Install Python
There are two ways to install python in windows using Python 3 installer or Anaconda. Installing python with anaconda or miniconda is recommended. In linux Python 3 is installed by default but we can also install miniconda or conda into linux.
- Creating Virtual Environment
Create a new python virtual environment using conda or venv and activate it. If Anaconda or Miniconda is installed use conda else use venv to create virtual environments.
- Using conda
conda create --name security_cam
conda activate security_cam
conda install pip
- Using venv in linux
python3 -m venv path/to/create/env/security_cam
source path/to/create/env/security_cam/bin/activate
- Using venv in windows
python -m venv path\to\create\env\security_cam
path\to\create\env\security_cam\Scripts\activate
Installing dependencies
The command below will install all the required dependencies from requirements.txt file.
pip install -r requirements.txt
Setup (On Production Machine)
Download the YOLOV7 model from here and place it in the root directory of the project. Then copy the dataset you downloaded from Roboflow to the YOLOV7-MAIN Folder and add the data.yaml file in main directory of the project. The data.yaml file should contain the following information: (The dataset folder name is monkey_data)
Note: Clone the YOLOV7 repository and do not download as a zip since .git folder is required for training and create a “static” and “results” named empty folder after copying templates folder to YOLOV7.
git clone https://github.com/WongKinYiu/yolov7.git
The data.yaml file should contain the following information:
train: monkey_data/train/images
val: monkey_data/valid/images
nc: 1
names: ["monkey"]
- Change your directory to the cloned repo
cd "yolov7-main"
- Also copy the files from this repository to the YOLO Folder same as the structured folder in the given drive link.
I used “Flask” as an API to connect the model with the web application.
Check out the flask file here app.py
Then I created a Docker image using Dockerfile and pushed it to the Docker Hub.
We can also use Docker-compose to run the application.
Due to errors in Credit/Debit cards or errors in AWS/Google cloud platforms i was not able to deploy the application.
How to Run
- Open terminal. Go into the cloned project directory and type the following command:
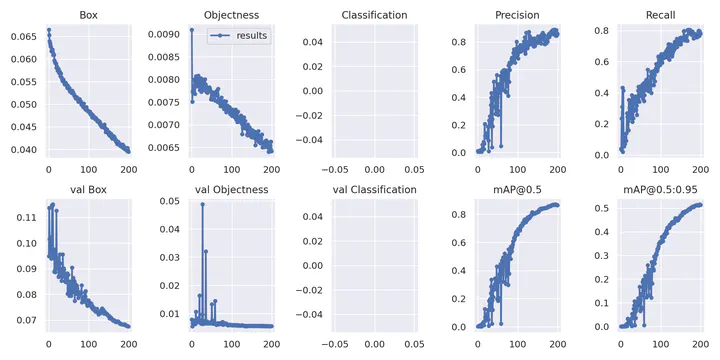
python3 train.py --epochs 128 --workers 8 --device 0 --batch-size 32 --data data.yaml --img 416 416 --cfg cfg/training/yolov7.yaml --weights '' --name Monkey-Model --hyp data/hyp.scratch.p5.yaml
- After training is done, run the following command to test the model on a video/image:
py detect.py --weights best.pt --project results --name results --source static/img.jpg --save-txt --save-conf
- If you want to try the Project then run the flask file app.py
python app.py
Additional guides
If get stuck in installation part follow these additional resources
Input Parameters
The Input Parameters used in this project are
- –epochs: Number of epochs to train the model.
- –workers: Number of workers to use for data loading.
- –device: Device to use for training.(0 for GPU and 1 for CPU)
- –batch-size: Batch size for training.
- –data: Path to data.yaml file.
- img: Image size.
- –cfg: Path to model.yaml file.
- –weights: Path to weights file. (Leave blank for training from scratch)
- –name: Name of the model.
- –hyp: Path to hyperparameters file.
Error Handling
Mostly you are supposed to get errors regarding cv2.imwrite() to a particular folder, At that time you need to create respected folders in the main directory.